
到上一章为止,我们的程序结构如下所示: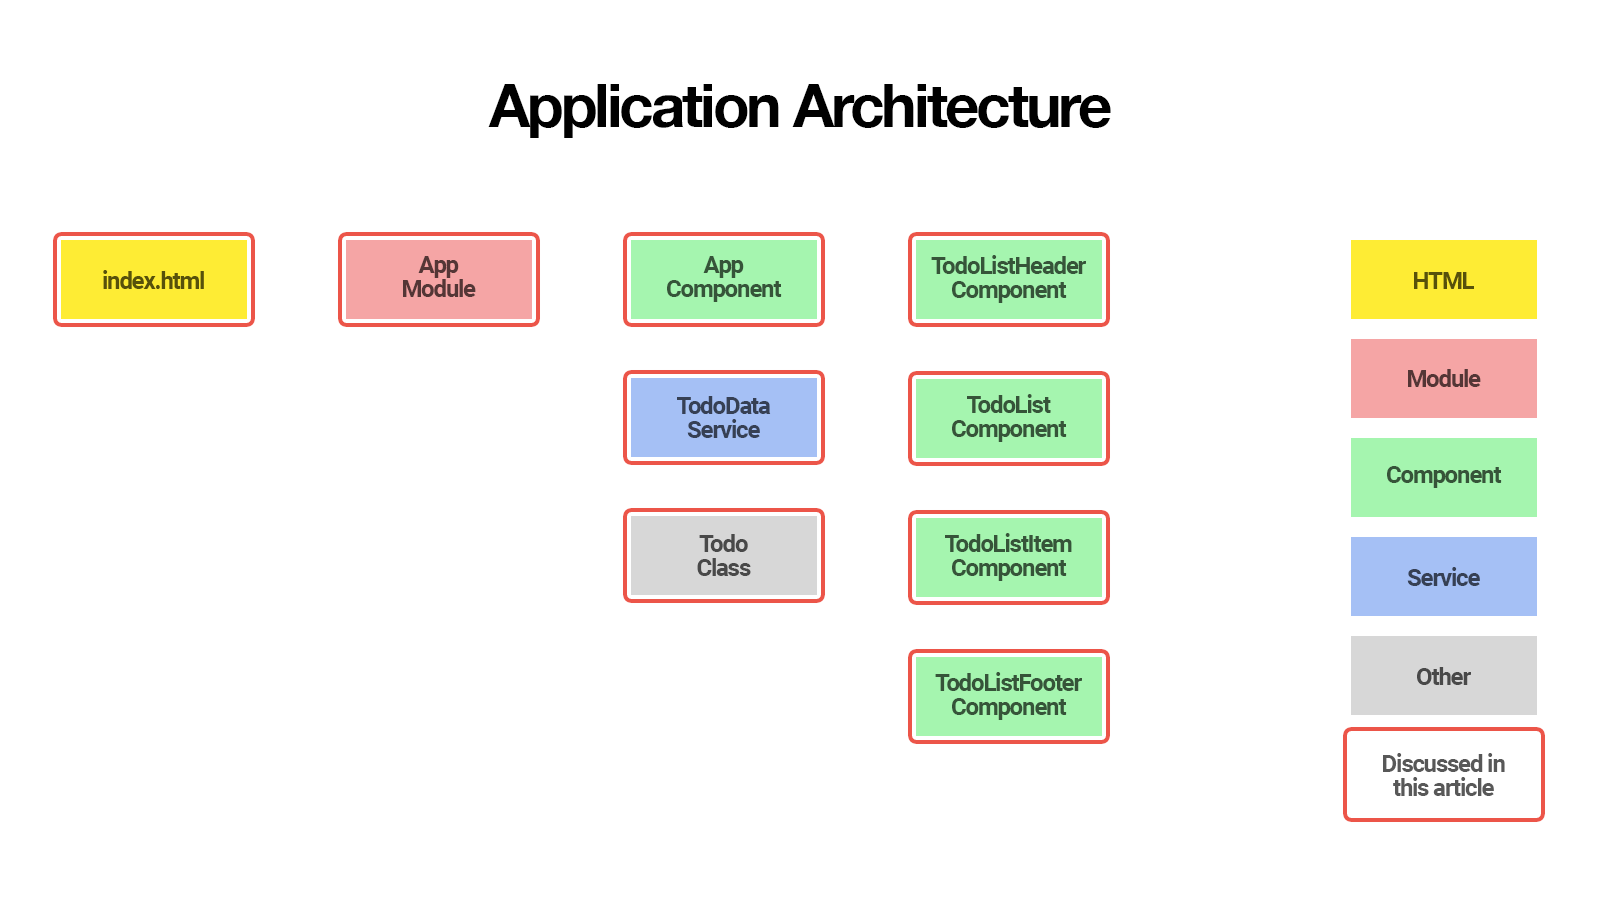
TodoDataService将所有的数据存储在内存中。在本章,我们将更改为和后端REST API通信。
在本篇文章中,我们将:
- 创建后端REST API mock
- 将API URL 作为环境变量存储
- 创建ApiService用于和 REST API 通信
- 更新TodoDataService来使用ApiService
- 更新AppComponent处理异步API调用
- 创建ApiMockService避免当运行单体测试的时候调用真正得HTTP
完成后,我们的应用程序架构会像这样: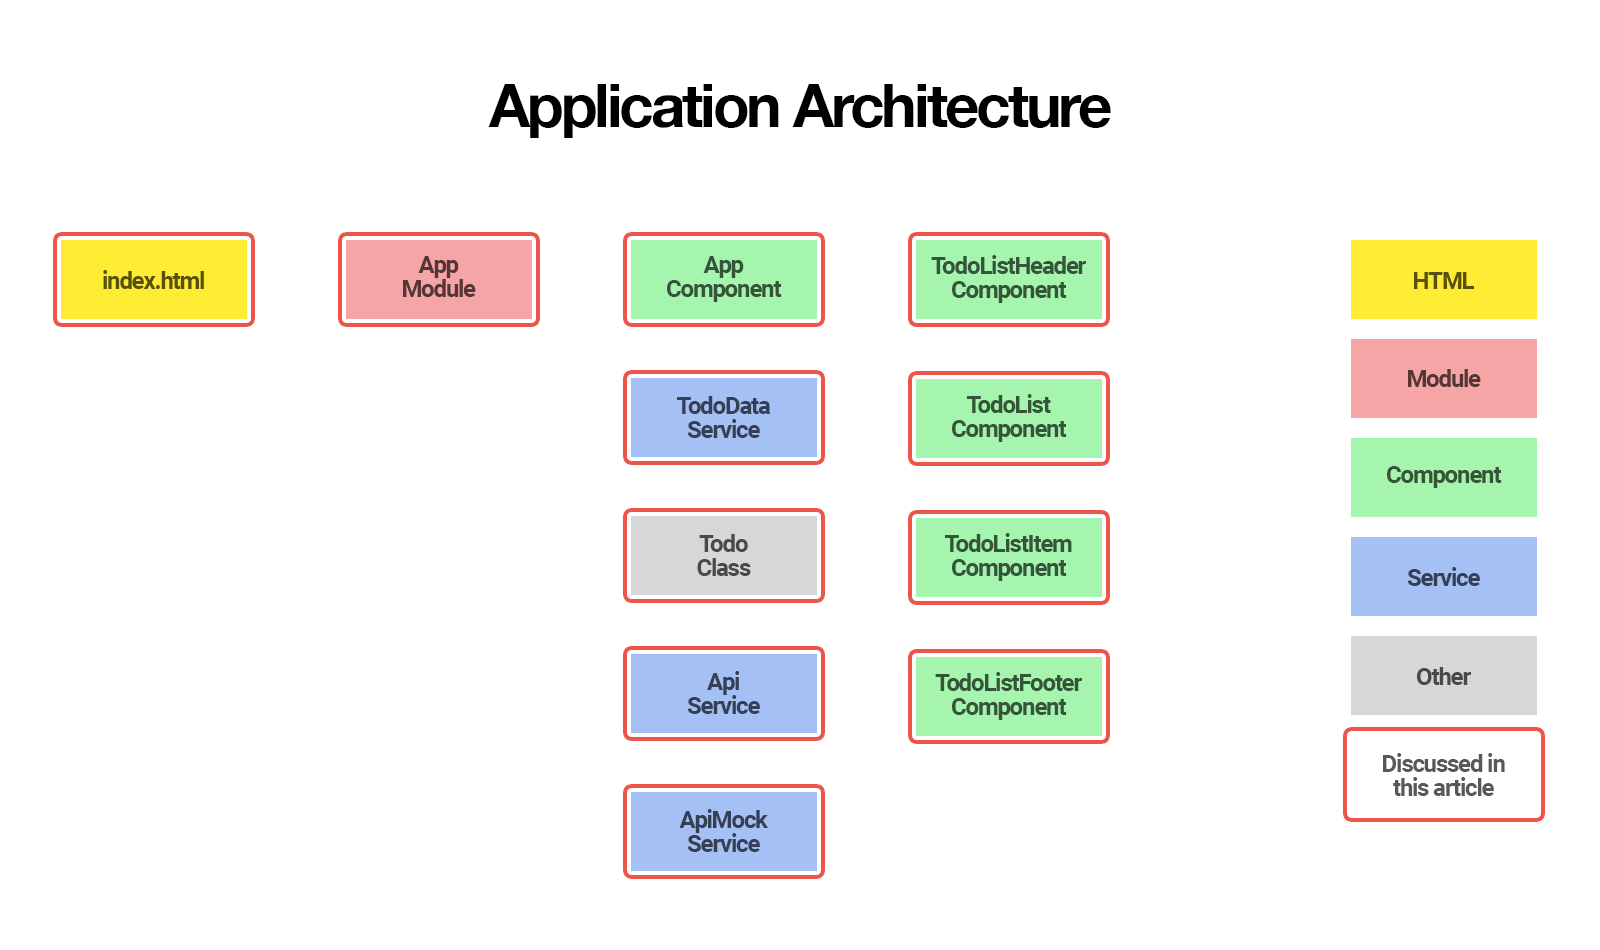
通过这篇文章,我们将学习到:
- 如何使用环境变量存储应用设置
- 如果使用Angular HTTP Client进行HTTP请求
- 如何处理Angular HTTP Client返回的对象
- 如何使用mock避免当运行单体测试的时候调用真正得HTTP
创建后端REST API
我们使用 json-server 快速创建 REST API mock
在当前应用得根目录运行:
npm install json-server –save
在根目录创建db.json,内容如下:1
2
3
4
5
6
7
8
9
10
11
12
13
14
15
16
17
18
19{
"todos": [
{
"id": 1,
"title": "Read SitePoint article",
"complete": false
},
{
"id": 2,
"title": "Clean inbox",
"complete": false
},
{
"id": 3,
"title": "Make restaurant reservation",
"complete": false
}
]
}
在package.json添加启动script:1
2
3
4"scripts": {
...
"json-server": "json-server --watch db.json"
}
我们能用以下命令启动REST API:
npm run json-server
命令行显示如下:1
2
3
4
5
6
7
8
9
10\{^_^}/ hi!
Loading db.json
Done
Resources
http://localhost:3000/todos
Home
http://localhost:3000
可以通过浏览器验证:
支持如下:
- GET /todos: 取得所有的todo
- GET /todos/:id: 取得指定的todo
- POST /todos: 创建一个新的todo
- PUT /todos/:id: 更新指定的todo
- DELETE /todos/:id: 删除指定的todo
存储 API URL
现在已经做成了后端REST API,我们必须在Angular应用中存储URL。
需要满足如下要求:
1,存储到单独的位置,当需要修改的时候,只需要修改一处
2,确保应用程序当在开发环境的时候使用开发环境的API,发布环境的时候使用发布环境的API
幸运的是,Angular CLI 支持环境设定,默认的情况下,有两个环境:development,production。 环境配置文件分别如下:
src/environments/environment.ts
src/environments/environment.prod.ts
添加API URL:1
2
3
4
5
6
7
8// src/environments/environment.ts
// used when we run `ng serve` or `ng build`
export const environment = {
production: false,
// URL of development API
apiUrl: 'http://localhost:3000'
};
1 | // src/environments/environment.prod.ts |
在应用程序中可以按照如下方式使用:1
2
3
4import { environment } from 'environments/environment';
// we can now access environment.apiUrl
const API_URL = environment.apiUrl;
当运行ng serve 或者 ng build,Angular CLI 使用 src/environments/environment.ts。
当运行ng serve –environment prod 或者 ng build –environment prod,Angular CLI 使用 src/environments/environment.prod.ts。
dev,prod和文件的对应关系在.angular-cli.json中定义:1
2
3
4"environments": {
"dev": "environments/environment.ts",
"prod": "environments/environment.prod.ts"
}
可以添加新的环境,例如staging:1
2
3
4
5"environments": {
"dev": "environments/environment.ts",
"staging": "environments/environment.staging.ts",
"prod": "environments/environment.prod.ts"
}
创建访问REST API 的 Service
首先创建ApiService:
ng g service Api
输出如下:1
2
3installing service
create src/app/api.service.spec.ts
create src/app/api.service.ts
打开src/app/api.service.ts:1
2
3
4
5
6
7
8
9
10import { Injectable } from '@angular/core';
@Injectable({
providedIn: 'root'
})
export class ApiService {
constructor() { }
}
添加Angular HTTP 方法1
2
3
4
5
6
7
8
9
10
11
12
13
14
15
16
17
18
19
20
21
22
23
24
25
26
27
28
29
30
31
32
33
34
35
36
37
38
39
40
41
42
43
44
45
46
47
48
49
50
51
52
53
54
55
56
57
58
59
60
61
62
63
64
65
66
67
68import { Injectable } from '@angular/core';
import { environment } from '../environments/environment';
import { HttpClient, HttpErrorResponse } from '@angular/common/http';
import { Todo } from './todo';
import { Observable, throwError } from 'rxjs';
import { catchError } from 'rxjs/operators';
const API_URL = environment.apiUrl;
@Injectable({
providedIn: 'root'
})
export class ApiService {
constructor(private http: HttpClient) { }
// API: GET /todos
public getAllTodos() : Observable<Todo[]> {
return this.http
.get<Todo[]>(API_URL + '/todos')
.pipe(
catchError(this.handleError)
);
}
public createTodo(todo: Todo): Observable<Todo> {
return this.http
.post<Todo>(API_URL + '/todos', todo)
.pipe(
catchError(this.handleError)
);
}
public getTodoById(todoId: number): Observable<Todo> {
return this.http
.get<Todo>(API_URL + '/todos/' + todoId)
.pipe(
catchError(this.handleError)
);
}
public updateTodo(todo: Todo): Observable<Todo> {
return this.http
.put<Todo>(API_URL + '/todos/' + todo.id, todo)
.pipe(
catchError(this.handleError)
);
}
public deleteTodoById(todoId: number): Observable<null> {
return this.http
.delete<null>(API_URL + '/todos/' + todoId)
.pipe(
catchError(this.handleError)
);
}
handleError(error: HttpErrorResponse) {
let errorMessage = '';
if(error.error instanceof ErrorEvent) {
// Get client-side error
errorMessage = error.error.message;
} else {
// Get server-side error
errorMessage = `Error Code: ${error.status}\nMessage: ${error.message}`;
}
window.alert(errorMessage);
return throwError(errorMessage);
}
}
更新 TodoDataService
当前的TodoDataService在内存中存储数据:1
2
3
4
5
6
7
8
9
10
11
12
13
14
15
16
17
18
19
20
21
22
23
24
25
26
27
28
29
30
31
32
33
34
35
36
37
38
39
40
41
42
43
44
45
46
47
48
49
50
51
52
53
54
55
56
57
58
59
60
61
62
63import {Injectable} from '@angular/core';
import {Todo} from './todo';
@Injectable()
export class TodoDataService {
// Placeholder for last id so we can simulate
// automatic incrementing of ids
lastId: number = 0;
// Placeholder for todos
todos: Todo[] = [];
constructor() {
}
// Simulate POST /todos
addTodo(todo: Todo): TodoDataService {
if (!todo.id) {
todo.id = ++this.lastId;
}
this.todos.push(todo);
return this;
}
// Simulate DELETE /todos/:id
deleteTodoById(id: number): TodoDataService {
this.todos = this.todos
.filter(todo => todo.id !== id);
return this;
}
// Simulate PUT /todos/:id
updateTodoById(id: number, values: Object = {}): Todo {
let todo = this.getTodoById(id);
if (!todo) {
return null;
}
Object.assign(todo, values);
return todo;
}
// Simulate GET /todos
getAllTodos(): Todo[] {
return this.todos;
}
// Simulate GET /todos/:id
getTodoById(id: number): Todo {
return this.todos
.filter(todo => todo.id === id)
.pop();
}
// Toggle todo complete
toggleTodoComplete(todo: Todo) {
let updatedTodo = this.updateTodoById(todo.id, {
complete: !todo.complete
});
return updatedTodo;
}
}
为了能够访问REST API,需要注入ApiService,修改后代码如下:1
2
3
4
5
6
7
8
9
10
11
12
13
14
15
16
17
18
19
20
21
22
23
24
25
26
27
28
29
30
31
32
33
34
35
36
37
38
39
40
41
42
43
44import { Injectable } from '@angular/core';
import {Todo} from './todo';
import { ApiService } from './api.service';
import { Observable } from 'rxjs';
@Injectable({
providedIn: 'root'
})
export class TodoDataService {
constructor(private api: ApiService) { }
// Simulate POST /todos
addTodo(todo: Todo): Observable<Todo> {
return this.api.createTodo(todo);
}
// Simulate DELETE /todos/:id
deleteTodoById(todoId: number): Observable<Todo> {
return this.api.deleteTodoById(todoId);
}
// Simulate PUT /todos/:id
updateTodo(todo: Todo): Observable<Todo> {
return this.api.updateTodo(todo);
}
// Simulate GET /todos
getAllTodos(): Observable<Todo[]> {
return this.api.getAllTodos();
}
// Simulate GET /todos/:id
getTodoById(todoId: number): Observable<Todo> {
return this.api.getTodoById(todoId);
}
// Toggle complete
toggleTodoComplete(todo: Todo) {
todo.complete = !todo.complete;
return this.api.updateTodo(todo);
}
}
更新 AppComponent
当前的AppComponent通过TodoDataService直接返回的Javascript对应或数组:1
2
3
4
5
6
7
8
9
10
11
12
13
14
15
16
17
18
19
20
21
22
23
24
25
26
27
28
29
30
31
32
33import {Component} from '@angular/core';
import {TodoDataService} from './todo-data.service';
@Component({
selector: 'app-root',
templateUrl: './app.component.html',
styleUrls: ['./app.component.css'],
providers: [TodoDataService]
})
export class AppComponent {
constructor(
private todoDataService: TodoDataService
) {
}
onAddTodo(todo) {
this.todoDataService.addTodo(todo);
}
onToggleTodoComplete(todo) {
this.todoDataService.toggleTodoComplete(todo);
}
onRemoveTodo(todo) {
this.todoDataService.deleteTodoById(todo.id);
}
get todos() {
return this.todoDataService.getAllTodos();
}
}
但是新的ApiService方法返回的是 Observables。
Observables是异步的,需要更新代码能正确处理Observable 返回值。
我们使用subscribe()方法订阅可观察对象(Observable)
在AppComponent初始化的时候,异步取得todos:1
2
3
4
5
6
7
8
9
10
11
12
13
14
15
16
17
18
19
20
21
22
23
24
25
26
27
28
29import { Component, OnInit } from '@angular/core';
import { TodoDataService } from './todo-data.service';
import { Todo } from './todo';
@Component({
selector: 'app-root',
templateUrl: './app.component.html',
styleUrls: ['./app.component.css'],
providers: [TodoDataService]
})
export class AppComponent implements OnInit {
todos: Todo[] = [];
constructor(
private todoDataService: TodoDataService
) {
}
public ngOnInit() {
this.todoDataService
.getAllTodos()
.subscribe(
(todos) => {
this.todos = todos;
}
);
}
}
首先我们定义一个public属性 todos,初始化为空数组。
在 ngOnInit() 方法 订阅 this.todoDataService.getAllTodos(),当值返回的时候,赋值给this.todos。
修改后完整的AppComponent如下:1
2
3
4
5
6
7
8
9
10
11
12
13
14
15
16
17
18
19
20
21
22
23
24
25
26
27
28
29
30
31
32
33
34
35
36
37
38
39
40
41
42
43
44
45
46
47
48
49
50
51
52
53
54
55
56
57import { Component, OnInit } from '@angular/core';
import {Todo} from './todo';
import {TodoDataService} from './todo-data.service';
@Component({
selector: 'app-root',
templateUrl: './app.component.html',
styleUrls: ['./app.component.css'],
providers: [TodoDataService]
})
export class AppComponent implements OnInit {
todos: Todo[] = [];
constructor(private todoDataService: TodoDataService) {
}
public ngOnInit() {
this.todoDataService
.getAllTodos()
.subscribe(
(todos) => {
this.todos = todos;
}
);
}
onAddTodo(todo) {
this.todoDataService
.addTodo(todo)
.subscribe(
(newTodo) => {
this.todos = this.todos.concat(newTodo);
}
);
}
onToggleTodoComplete(todo) {
this.todoDataService
.toggleTodoComplete(todo)
.subscribe(
(updatedTodo) => {
todo = updatedTodo;
}
);
}
onRemoveTodo(todo) {
this.todoDataService
.deleteTodoById(todo.id)
.subscribe(
(_) => {
this.todos = this.todos.filter((t) => t.id !== todo.id);
}
);
}
}
运行
看一看所有的代码是否能正常运行。
打开terminal,启动 REST API:
npm run json-server
启动 Angular 应用程序
ng serve
浏览器访问 http://localhost:4200 显示如下:
单体测试
更新中
创建ApiMockService
更新中
